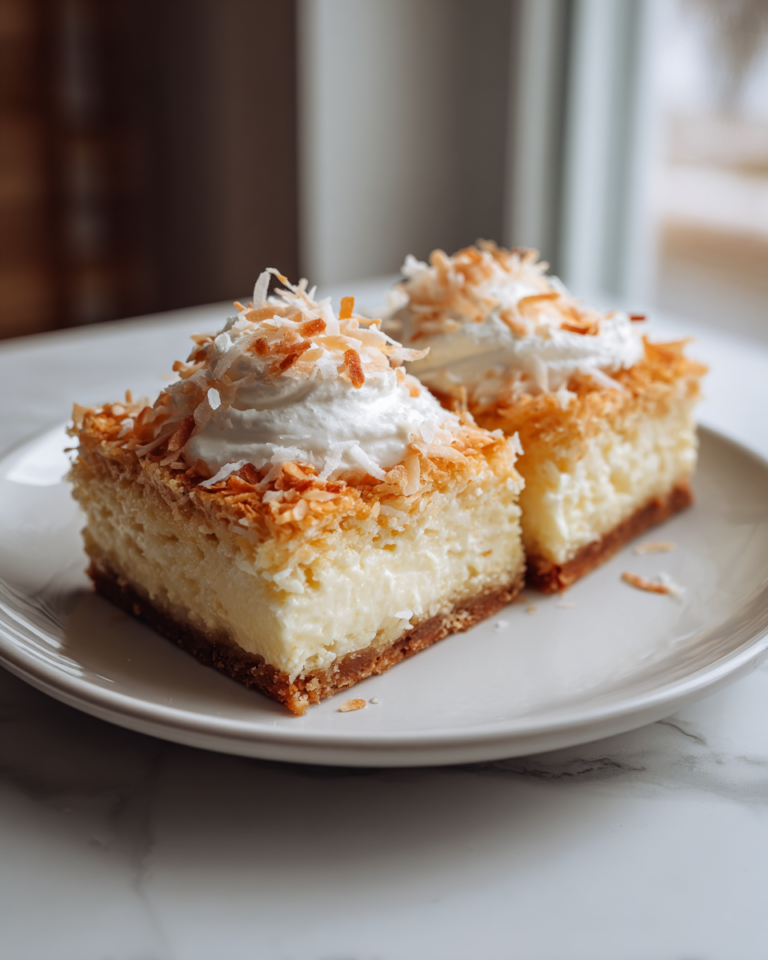
Irresistible Salted Caramel Cheesecake Crunch Bars You Have to Try
There’s something truly special about a dessert that brings a little sparkle to a busy weeknight or steals the show at a family gathering. Salted Caramel Cheesecake Crunch Bars are exactly that kind of treat—rich, indulgent, and packed with layers of flavor that make every bite feel like a celebration. I still remember the first time I made these bars, standing on that familiar stool in my grandmother’s kitchen, eager to learn how simple ingredients could turn into something magical. These bars have since become a family favorite, a sweet way to slow down and share love around the table amid the everyday chaos.
Table of Contents
Why You’ll Love This Salted Caramel Cheesecake Crunch Bars
These bars perfectly capture the balance between creamy cheesecake, buttery crunch, and just the right sprinkle of sea salt to highlight the caramel’s rich depth. What I love most is how they manage to feel both decadent and approachable—no fancy techniques or hard-to-find ingredients, just comfort in every bite. As a mom juggling dinner plans and homework, I appreciate desserts that come together quickly but still deliver on that “wow” factor when my family takes their first forkful.
Over the years, I’ve found that desserts like these bars are more than just sweets; they’re anchors in my kitchen story. They remind me of slow afternoons baking with my grandmother and the joy of sharing a homemade treat with loved ones. These bars hold onto that sentiment while adding a fresh crunch and salty caramel twist that keeps everyone coming back for more.
Ingredients You’ll Need for This Salted Caramel Cheesecake Crunch Bars
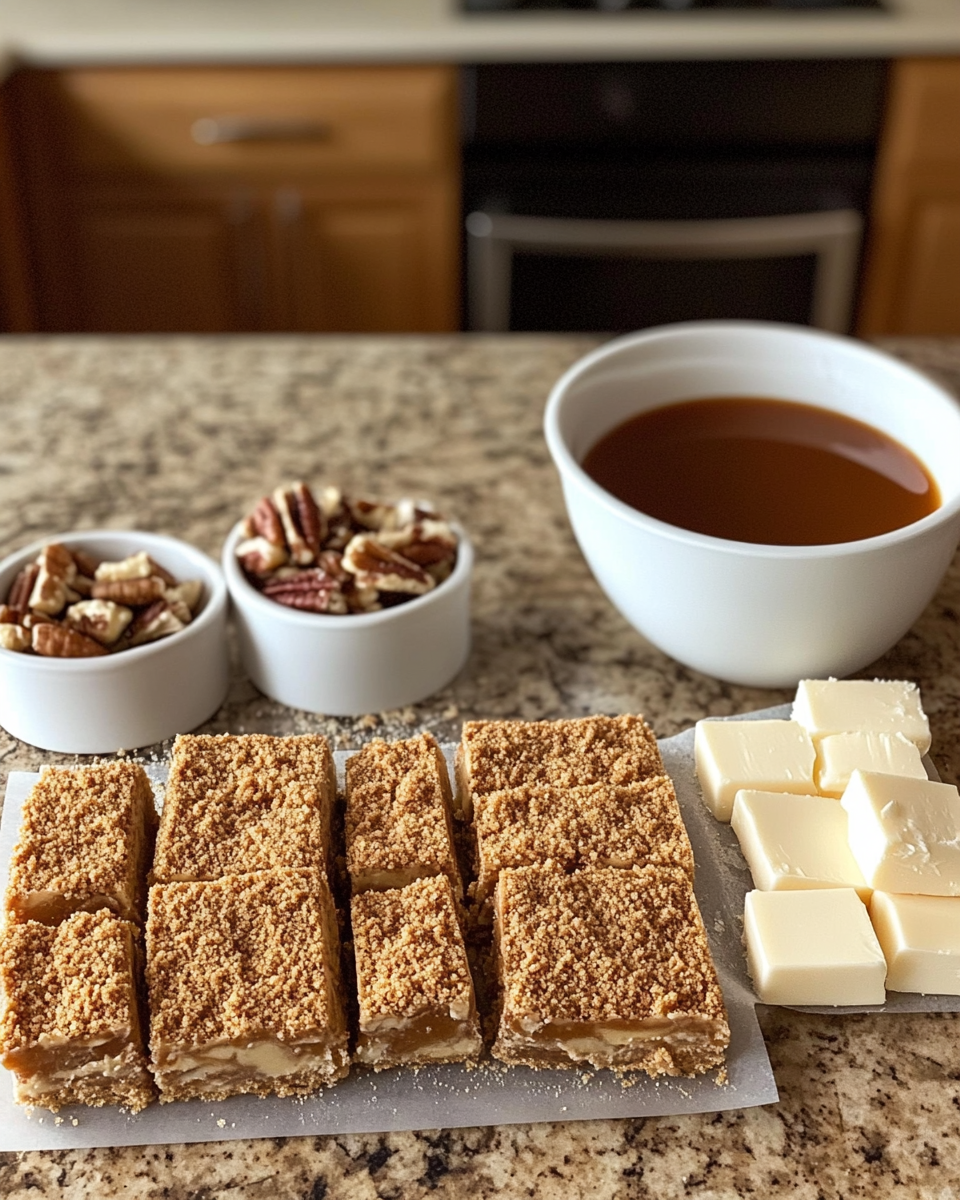
- 2 cups graham cracker crumbs (about 15 full sheets)
- 1/2 cup unsalted butter, melted
- 1/4 cup granulated sugar
- 16 oz cream cheese, softened
- 2/3 cup granulated sugar
- 2 large eggs
- 1 teaspoon vanilla extract
- 1 cup caramel sauce (store-bought or homemade)
- 1/2 teaspoon flaky sea salt (such as Maldon)
- 1 cup crushed toffee bits or chopped pecans for crunch
If you don’t have graham crackers on hand, digestive biscuits or even crushed vanilla wafers make a wonderful substitute for the crust. For a dairy-free option, try vegan cream cheese and coconut oil instead of butter—though it will change the texture slightly, it’s still delicious! And if you’re feeling adventurous, swapping pecans for toasted almonds adds a lovely nutty flavor.
Nutrition Facts
- Calories: Approximately 350 per bar (based on 12 bars)
- Protein: 5g
- Fat: 22g (mostly from butter, cream cheese, and nuts)
- Carbohydrates: 33g
- Fiber: 1g
- Sugar: 22g
- Sodium: 220mg
While these bars are definitely a treat, I like to think of them as a reward for all the hustle that fills our kitchen on a typical day. The richness means a little goes a long way, making them perfect for sharing and savoring slowly around the table.
Print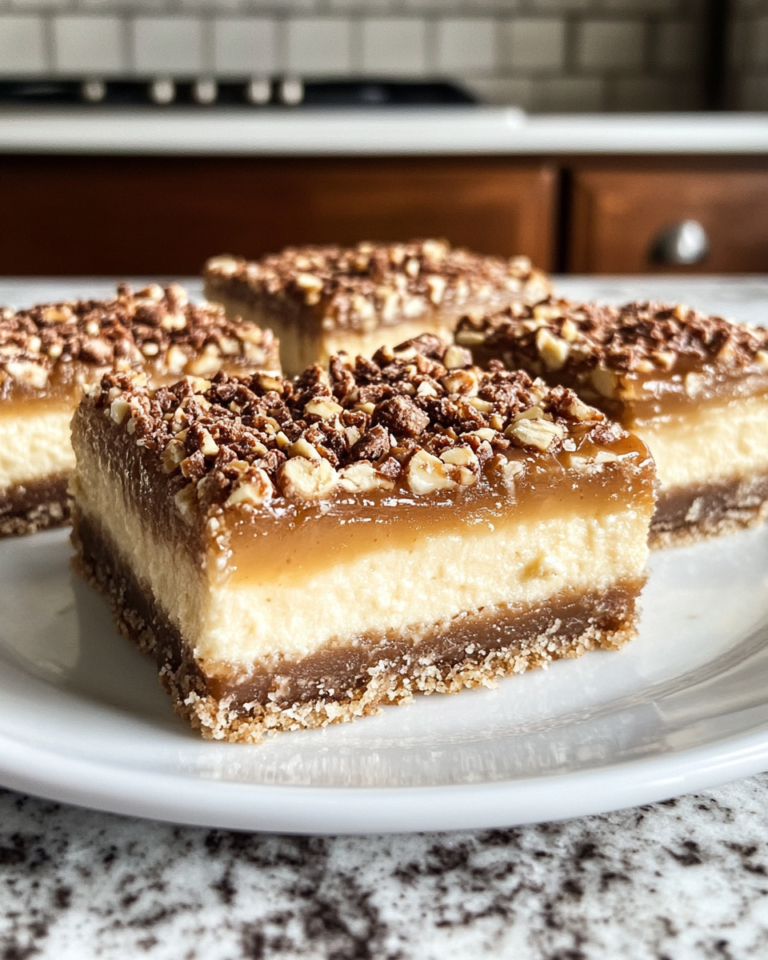
Irresistible Salted Caramel Cheesecake Crunch Bars You Have to Try
Learn how to make delicious Salted Caramel Cheesecake Crunch Bars. Easy recipe with step-by-step instructions.
- Total Time: 45 minutes
- Yield: 4 servings 1x
Ingredients
- 2 cups graham cracker crumbs (about 15 full sheets)
- 1/2 cup unsalted butter, melted
- 1/4 cup granulated sugar
- 16 oz cream cheese, softened
- 2/3 cup granulated sugar
- 2 large eggs
- 1 teaspoon vanilla extract
- 1 cup caramel sauce (store-bought or homemade)
- 1/2 teaspoon flaky sea salt (such as Maldon)
- 1 cup crushed toffee bits or chopped pecans for crunch
If you don’t have graham crackers on hand, digestive biscuits or even crushed vanilla wafers make a wonderful substitute for the crust. For a dairy-free option, try vegan cream cheese and coconut oil instead of butter—though it will change the texture slightly, it’s still delicious! And if you’re feeling adventurous, swapping pecans for toasted almonds adds a lovely nutty flavor.
Instructions
- Preheat your oven to 325°F (160°C) and line a 9×13-inch baking pan with parchment paper, leaving some overhang for easy removal later.
- In a medium bowl, combine the graham cracker crumbs, melted butter, and 1/4 cup sugar. Stir until the mixture resembles wet sand. Press this mixture firmly and evenly into the bottom of the prepared pan to form the crust.
- Bake the crust for 10 minutes, then remove it from the oven and let it cool slightly while you prepare the cheesecake layer.
- In a large bowl, beat the softened cream cheese with 2/3 cup sugar until smooth and creamy. I like to use an electric mixer here for the smoothest texture, but a sturdy whisk works in a pinch.
- Add the eggs one at a time, mixing well after each addition, then stir in the vanilla extract. Be careful not to overmix to avoid cracks in the cheesecake layer.
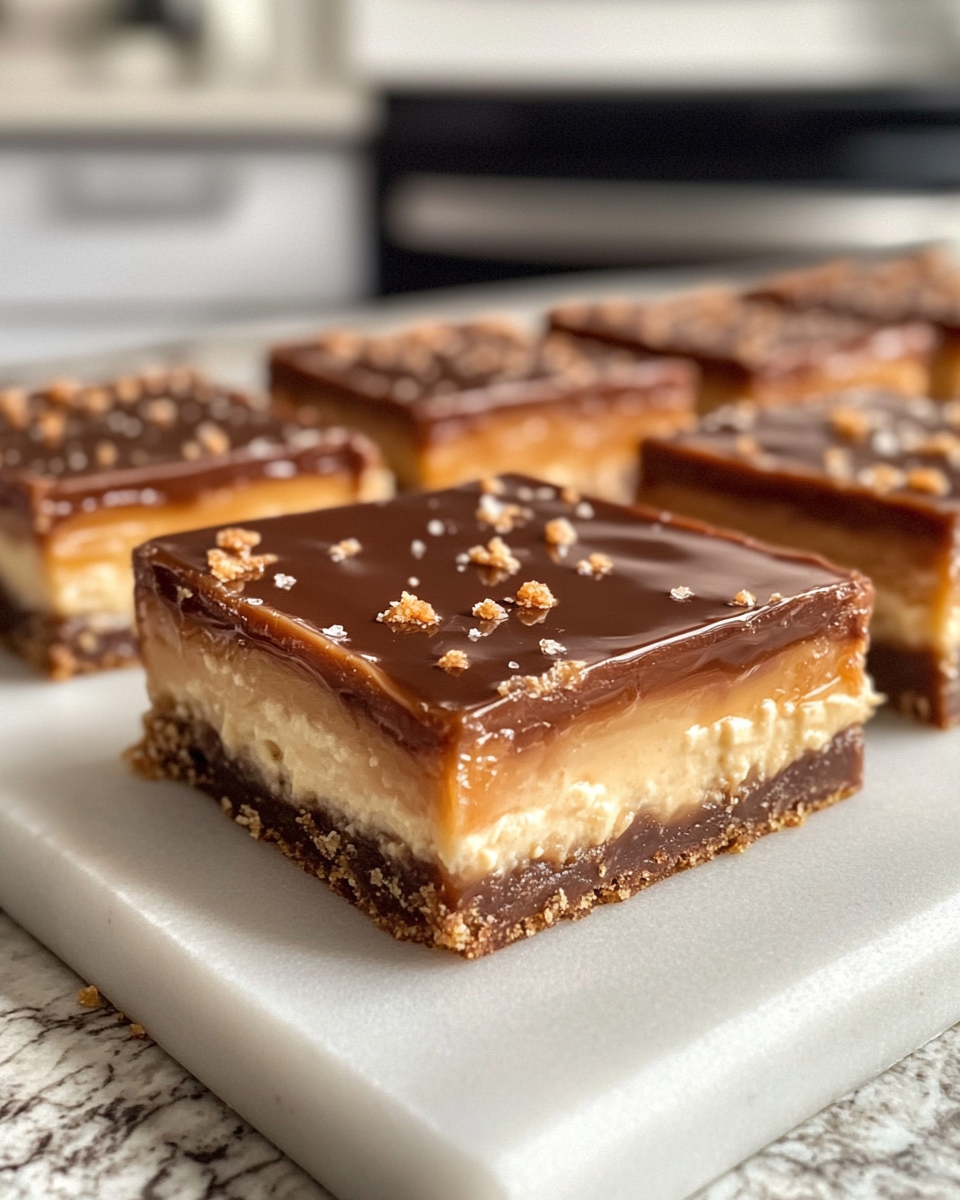
- Pour the cheesecake batter evenly over the warm crust and spread gently with a spatula.
- Drizzle the caramel sauce evenly over the cheesecake layer. Using a skewer or butter knife, swirl the caramel gently into the batter to create a marbled effect.
- Sprinkle the crushed toffee bits or chopped pecans evenly over the top, then finish with a light sprinkle of flaky sea salt.
- Bake for 35-40 minutes, until the edges are set but the center still jiggles slightly when you gently shake the pan. This ensures a creamy texture once cooled.
- Allow the bars to cool completely at room temperature, then refrigerate for at least 3 hours or overnight to firm up before slicing.
One of my favorite kitchen memories is watching my kids peek over my shoulder as the bars baked, the warm caramel scent filling the house and pulling us all together. It’s these little moments that remind me why I started RecipeChic—to share not just recipes, but the love and connection food brings.
- Prep Time: 15 minutes
- Cook Time: 30 minutes
- Category: Main Dish
- Method: Cooking
- Cuisine: International
Steps to Create Your Salted Caramel Cheesecake Crunch Bars
- Preheat your oven to 325°F (160°C) and line a 9×13-inch baking pan with parchment paper, leaving some overhang for easy removal later.
- In a medium bowl, combine the graham cracker crumbs, melted butter, and 1/4 cup sugar. Stir until the mixture resembles wet sand. Press this mixture firmly and evenly into the bottom of the prepared pan to form the crust.
- Bake the crust for 10 minutes, then remove it from the oven and let it cool slightly while you prepare the cheesecake layer.
- In a large bowl, beat the softened cream cheese with 2/3 cup sugar until smooth and creamy. I like to use an electric mixer here for the smoothest texture, but a sturdy whisk works in a pinch.
- Add the eggs one at a time, mixing well after each addition, then stir in the vanilla extract. Be careful not to overmix to avoid cracks in the cheesecake layer.
- Pour the cheesecake batter evenly over the warm crust and spread gently with a spatula.
- Drizzle the caramel sauce evenly over the cheesecake layer. Using a skewer or butter knife, swirl the caramel gently into the batter to create a marbled effect.
- Sprinkle the crushed toffee bits or chopped pecans evenly over the top, then finish with a light sprinkle of flaky sea salt.
- Bake for 35-40 minutes, until the edges are set but the center still jiggles slightly when you gently shake the pan. This ensures a creamy texture once cooled.
- Allow the bars to cool completely at room temperature, then refrigerate for at least 3 hours or overnight to firm up before slicing.
One of my favorite kitchen memories is watching my kids peek over my shoulder as the bars baked, the warm caramel scent filling the house and pulling us all together. It’s these little moments that remind me why I started RecipeChic—to share not just recipes, but the love and connection food brings. Learn more: Irresistible Salted Caramel Crunch Cookies You Need to Try
Tips for Making the Best Salted Caramel Cheesecake Crunch Bars
- Use room temperature cream cheese: This helps the batter blend smoothly and prevents lumps, which I learned the hard way on my first try!
- Don’t skip the sea salt: The flaky salt sprinkled on top is what balances the sweetness and brings out the caramel’s richness.
- Press the crust firmly: A compact crust holds together better when you cut the bars, making them easier to serve and eat.
- Chill thoroughly: Patience pays off here. Giving the bars enough time to set in the fridge makes slicing clean and keeps the layers distinct.
- Customize the crunch: Try swapping toffee bits for chopped hazelnuts or even crushed pretzels for a salty twist—my family loves experimenting with this part!
Serving Suggestions and Pairings
Salted Caramel Cheesecake Crunch Bars are rich enough to stand on their own, but I’ve found that pairing them with a simple cup of black coffee or a mild herbal tea really lets the flavors shine. For special occasions, a scoop of vanilla bean ice cream or a drizzle of extra caramel sauce adds an extra layer of indulgence that everyone loves.
When my husband and I sneak a quiet moment after the kids are asleep, these bars with a small glass of dessert wine have become our sweet little tradition—a reminder that even in the busiest seasons, there’s always time to slow down and savor something good.
Storage and Reheating Tips
These bars keep beautifully in the fridge for up to five days, wrapped tightly or stored in an airtight container. Because of the creamy cheesecake layer, I don’t recommend freezing them—though if you must, wrap tightly and thaw slowly in the fridge overnight for best results.
If you prefer your bars slightly softer, you can take them out of the fridge about 15-20 minutes before serving. I often do this when hosting friends, giving the bars a little time to warm up while we chat and laugh around the table.
Frequently Asked Questions
What are the main ingredients for Salted Caramel Cheesecake Crunch Bars?
The main ingredients for Salted Caramel Cheesecake Crunch Bars include the items listed in our ingredients section above. Each ingredient plays a crucial role in achieving the perfect flavor and texture.
How long does it take to make Salted Caramel Cheesecake Crunch Bars?
The total time to make Salted Caramel Cheesecake Crunch Bars includes both preparation and cooking time. Check the recipe card above for exact timing details.
Can I make Salted Caramel Cheesecake Crunch Bars ahead of time?
Yes, Salted Caramel Cheesecake Crunch Bars can often be prepared in advance. Store it properly in an airtight container in the refrigerator and consume within the recommended timeframe.
What can I serve with Salted Caramel Cheesecake Crunch Bars?
Salted Caramel Cheesecake Crunch Bars pairs well with various sides and accompaniments. Consider the serving suggestions mentioned in the recipe for the best dining experience.
Is Salted Caramel Cheesecake Crunch Bars suitable for special diets?
Depending on the ingredients used, Salted Caramel Cheesecake Crunch Bars may be adapted for various dietary needs. Check the ingredients list and consider substitutions as needed for your dietary requirements.
Final Thoughts
Salted Caramel Cheesecake Crunch Bars are more than just a dessert to me—they’re a slice of family history, a moment of calm in the whirlwind of daily life, and a delicious way to say “I love you” without words. From standing on that kitchen stool with my grandmother to balancing the demands of motherhood and work, these bars have been a steady source of joy and connection.
So whether you’re baking for your family, a crowd, or just yourself, I hope these bars bring a little magic and warmth to your kitchen. Pull up a chair, grab a fork, and share in the sweet stories that come with every bite. Because here at RecipeChic, food is never just about eating—it’s about living, loving, and creating memories that last.