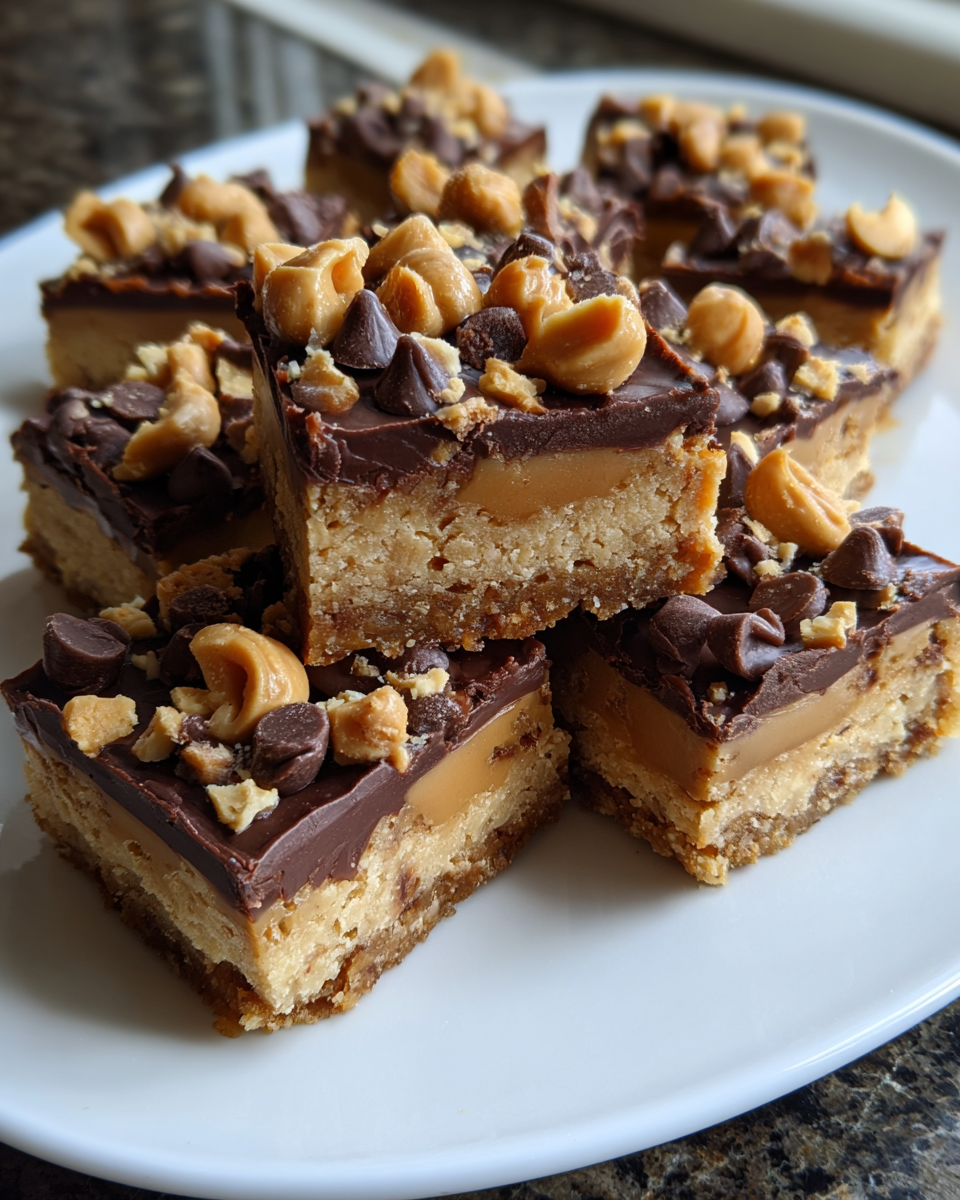
Irresistible Peanut Butter Cookie Dough Bars You Need to Try
There’s something undeniably comforting about a sweet treat you can grab with your hands, no fork required—especially when it’s packed with the nostalgic flavors of peanut butter cookie dough. Peanut Butter Cookie Dough Bars have become a staple in my home, a quick and satisfying way to bring a little joy to hectic days. I remember those busy weeknights when the kids were running around, and dinner was still a few minutes away. These bars were my secret weapon to keep everyone happy and energized, without a lot of fuss. They’re a reminder that even in the busiest moments, we can pause, share a bite, and create a little warmth at our kitchen table.
Table of Contents
Why You’ll Love This Peanut Butter Cookie Dough Bars
First off, these Peanut Butter Cookie Dough Bars are the perfect balance of creamy, sweet, and a little bit salty, which makes them downright addictive. They’re a no-bake delight, which means you can whip them up quickly without turning on the oven—a blessing when you’re juggling work, kids, and the endless to-do list that is family life. My grandmother taught me early on that cooking doesn’t have to be complicated to feel special. These bars carry that lesson: simple ingredients that come together to create something truly comforting.
Another reason I’m so fond of these bars is how versatile they are. Whether you want a quick snack after school, a lunchbox surprise, or a little pick-me-up with your afternoon coffee, they fit the bill. Plus, they store beautifully, so there’s always a stash ready to go for those moments when hunger strikes unexpectedly. For me, food is about connection, and sharing these bars with my family has become a little ritual that turns ordinary days into memorable ones.
Ingredients You’ll Need for This Peanut Butter Cookie Dough Bars
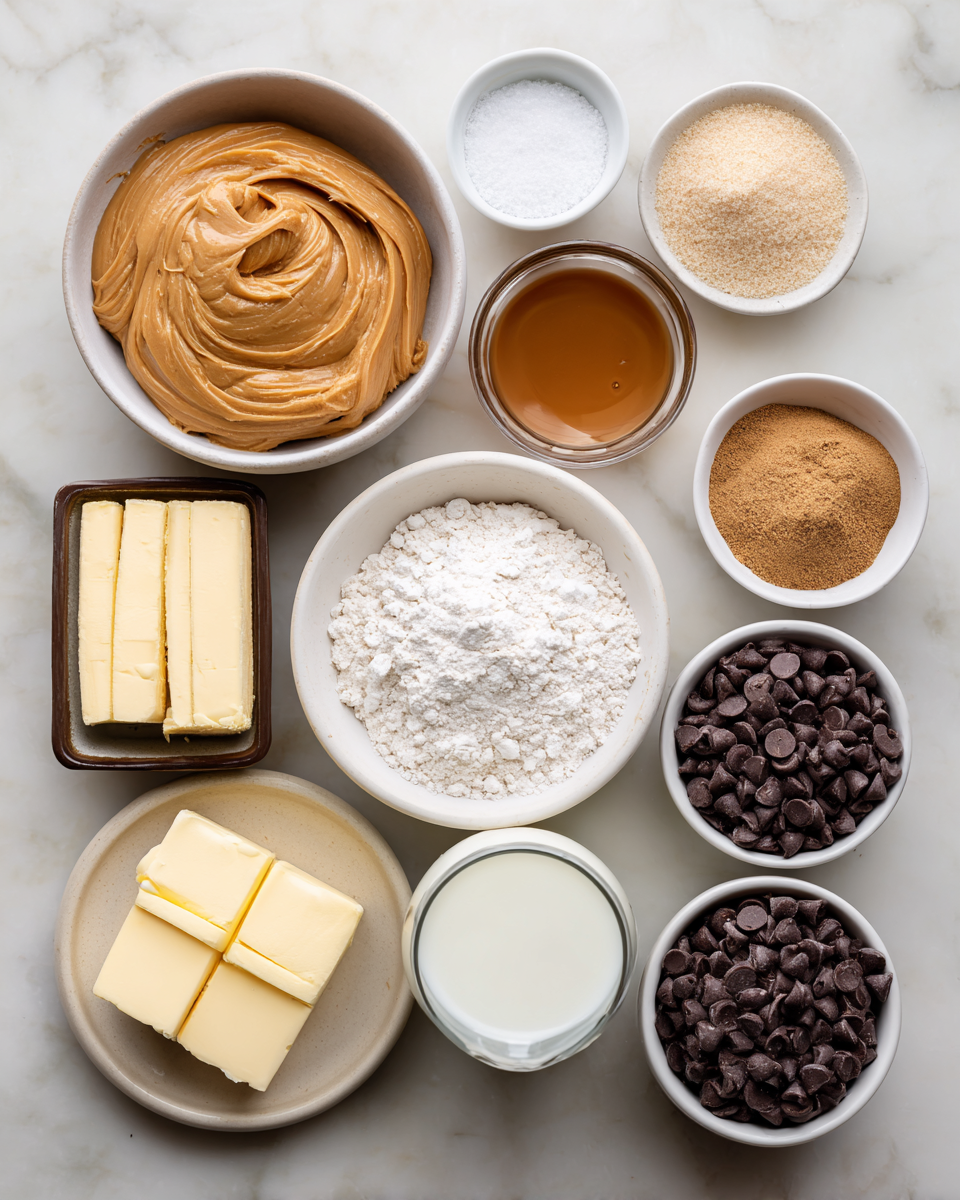
- 1 cup creamy peanut butter (natural or classic, depending on your preference)
- 1/2 cup unsalted butter, softened
- 1 cup brown sugar, packed
- 1/4 cup granulated sugar
- 2 teaspoons vanilla extract
- 2 cups all-purpose flour
- 1/2 teaspoon salt
- 1 cup mini chocolate chips (optional but recommended!)
- 2 tablespoons milk (or almond milk for dairy-free)
If you’re looking to swap out ingredients, I’ve found that using almond butter instead of peanut butter works beautifully for a different nutty flavor. For a gluten-free version, try a 1:1 gluten-free flour blend—just be sure it’s one that measures like regular flour. And if you want to cut back on sugar, reducing the granulated sugar by a couple of tablespoons still keeps these bars deliciously sweet but less intense.
Nutrition Facts
- Calories: Approximately 280 per bar (based on 12 servings)
- Protein: 6g
- Fat: 18g (mostly from peanut butter and butter)
- Carbohydrates: 24g
- Fiber: 2g
- Sugar: 14g
- Sodium: 120mg
While these bars are a treat, they also offer a bit of protein from the peanut butter, which helps keep hunger at bay. I always remind myself—and my readers—that enjoying a sweet snack like this is about balance and pleasure. Life’s too short not to savor the good stuff, especially when it’s homemade with love.
Print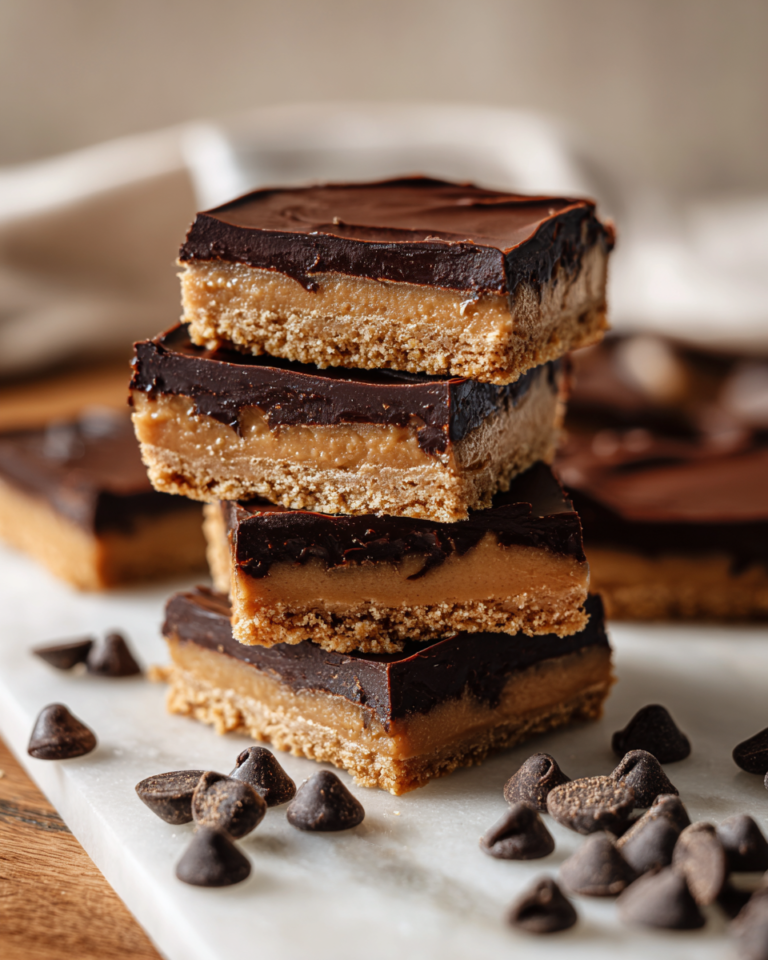
Irresistible Peanut Butter Cookie Dough Bars You Need to Try
Learn how to make delicious Peanut Butter Cookie Dough Bars. Easy recipe with step-by-step instructions.
- Total Time: 45 minutes
- Yield: 4 servings 1x
Ingredients
- 1 cup creamy peanut butter (natural or classic, depending on your preference)
- 1/2 cup unsalted butter, softened
- 1 cup brown sugar, packed
- 1/4 cup granulated sugar
- 2 teaspoons vanilla extract
- 2 cups all-purpose flour
- 1/2 teaspoon salt
- 1 cup mini chocolate chips (optional but recommended!)
- 2 tablespoons milk (or almond milk for dairy-free)
If you’re looking to swap out ingredients, I’ve found that using almond butter instead of peanut butter works beautifully for a different nutty flavor. For a gluten-free version, try a 1:1 gluten-free flour blend—just be sure it’s one that measures like regular flour. And if you want to cut back on sugar, reducing the granulated sugar by a couple of tablespoons still keeps these bars deliciously sweet but less intense.
Instructions
- Start by lining an 8×8 inch square baking pan with parchment paper, leaving some overhang to easily lift the bars out later.
- In a large mixing bowl, cream together the softened butter, peanut butter, brown sugar, and granulated sugar using a hand mixer or stand mixer. Beat until the mixture is light and fluffy, about 3-4 minutes. This step is key for that smooth, dreamy texture.
- Mix in the vanilla extract and milk, blending until fully incorporated.
- In a separate bowl, whisk together the flour and salt to ensure even distribution.
- Gradually add the dry ingredients to the wet mixture, stirring just until combined. The dough will be soft but firm enough to hold shape.
- Fold in the mini chocolate chips, saving a handful to sprinkle on top for an inviting finish.
- Transfer the dough into your prepared pan and press it evenly with your hands or the back of a spatula. Sprinkle the reserved chocolate chips on top and gently press them in.
- Place the pan in the refrigerator for at least 2 hours, or until the bars are firm enough to cut cleanly.
- Using the parchment overhang, lift the bars from the pan and slice into 12 equal squares. For clean cuts, wipe your knife with a warm, damp cloth between slices.
One thing I’ve learned from years in the kitchen is patience truly pays off here. The chilling step is crucial—it lets the flavors meld and the texture set perfectly. When my kids helped me make these, they always wanted to sneak a taste before the bars were ready. I’d remind them that good things take time, and that wait made the reward all the sweeter.
- Prep Time: 15 minutes
- Cook Time: 30 minutes
- Category: Main Dish
- Method: Cooking
- Cuisine: International
Steps to Create Your Peanut Butter Cookie Dough Bars
- Start by lining an 8×8 inch square baking pan with parchment paper, leaving some overhang to easily lift the bars out later.
- In a large mixing bowl, cream together the softened butter, peanut butter, brown sugar, and granulated sugar using a hand mixer or stand mixer. Beat until the mixture is light and fluffy, about 3-4 minutes. This step is key for that smooth, dreamy texture.
- Mix in the vanilla extract and milk, blending until fully incorporated.
- In a separate bowl, whisk together the flour and salt to ensure even distribution.
- Gradually add the dry ingredients to the wet mixture, stirring just until combined. The dough will be soft but firm enough to hold shape.
- Fold in the mini chocolate chips, saving a handful to sprinkle on top for an inviting finish.
- Transfer the dough into your prepared pan and press it evenly with your hands or the back of a spatula. Sprinkle the reserved chocolate chips on top and gently press them in.
- Place the pan in the refrigerator for at least 2 hours, or until the bars are firm enough to cut cleanly.
- Using the parchment overhang, lift the bars from the pan and slice into 12 equal squares. For clean cuts, wipe your knife with a warm, damp cloth between slices.
One thing I’ve learned from years in the kitchen is patience truly pays off here. The chilling step is crucial—it lets the flavors meld and the texture set perfectly. When my kids helped me make these, they always wanted to sneak a taste before the bars were ready. I’d remind them that good things take time, and that wait made the reward all the sweeter. Learn more: Irresistible Rice Krispie Chocolate Chip Cookies You Need to Try
Tips for Making the Best Peanut Butter Cookie Dough Bars
- Use room temperature ingredients: Softened butter and peanut butter mix much more easily, giving you a smoother dough.
- Don’t overmix the flour: Stir just until combined to keep your bars tender, not tough.
- Customize your chocolate chips: Dark, semi-sweet, or even white chocolate chips all work—choose what you love most.
- Press firmly: When spreading the dough in the pan, press evenly and firmly to avoid crumbly bars.
- Chill thoroughly: This is non-negotiable. The chilling time helps the bars set and develop the perfect chewy texture.
When I first made these bars, I was worried about getting the texture right. It took a couple of tries, but I quickly realized that the little details—like pressing the dough firmly and letting the bars chill well—made all the difference. Cooking is a journey, and every kitchen mishap is just another story to tell.
Serving Suggestions and Pairings
Peanut Butter Cookie Dough Bars are wonderfully flexible when it comes to how you enjoy them. Here are some of my favorite ways to serve them:
- With a cold glass of milk—whether dairy or your favorite plant-based option—for a classic indulgence.
- Alongside a cup of coffee or tea, turning an ordinary afternoon into a cozy little break.
- Cut into smaller bite-sized pieces for parties or school snacks—these bars are always a hit with kids!
- Paired with fresh fruit like sliced bananas or strawberries, which add a refreshing balance to the richness.
- Drizzled with a little melted chocolate or caramel for an extra special treat during holidays or celebrations.
In my family, sharing these bars has become a way to slow down and connect, especially on busy days when time feels scarce. I hope these serving ideas inspire you to make your own moments of joy around the table.
Storage and Reheating Tips
One of the things I appreciate most about these Peanut Butter Cookie Dough Bars is how well they keep. Here’s how I recommend storing and enjoying them over time:
- Refrigerate: Store bars in an airtight container in the fridge for up to one week. This keeps them fresh and chewy.
- Freeze: For longer storage, wrap bars individually in plastic wrap and place them in a freezer-safe container or bag. They freeze beautifully for up to three months.
- Thawing: Let frozen bars thaw in the refrigerator overnight. You can also enjoy them slightly frozen for a refreshing treat during warmer months.
- Reheating: Since these bars are no-bake, reheating isn’t necessary. But if you like them extra soft, a few seconds in the microwave (10-15 seconds) works wonders.
In my busy household, I often make a double batch and freeze half, so there’s always a stash ready for those unexpected snack attacks. It’s like having a little homemade comfort food emergency kit on hand!
Frequently Asked Questions
What are the main ingredients for Peanut Butter Cookie Dough Bars?
The main ingredients for Peanut Butter Cookie Dough Bars include the items listed in our ingredients section above. Each ingredient plays a crucial role in achieving the perfect flavor and texture.
How long does it take to make Peanut Butter Cookie Dough Bars?
The total time to make Peanut Butter Cookie Dough Bars includes both preparation and cooking time. Check the recipe card above for exact timing details.
Can I make Peanut Butter Cookie Dough Bars ahead of time?
Yes, Peanut Butter Cookie Dough Bars can often be prepared in advance. Store it properly in an airtight container in the refrigerator and consume within the recommended timeframe.
What can I serve with Peanut Butter Cookie Dough Bars?
Peanut Butter Cookie Dough Bars pairs well with various sides and accompaniments. Consider the serving suggestions mentioned in the recipe for the best dining experience.
Is Peanut Butter Cookie Dough Bars suitable for special diets?
Depending on the ingredients used, Peanut Butter Cookie Dough Bars may be adapted for various dietary needs. Check the ingredients list and consider substitutions as needed for your dietary requirements.
Final Thoughts
Peanut Butter Cookie Dough Bars are more than just a sweet treat in our home—they’re a reminder of the small moments where food becomes love made edible. From standing on that kitchen stool with my grandmother to juggling the whirlwind of family life today, these bars have been a delicious thread connecting past and present. They prove you don’t need fancy ingredients or complicated steps to create something meaningful.
Whether you’re a busy parent, a novice cook, or someone who just loves a good cookie dough fix, I hope these bars find a place in your kitchen and your heart. Remember, every recipe tells a story, and I’m so glad to share this one with you. So next time you want a quick, satisfying snack that feels like a warm hug, reach for these Peanut Butter Cookie Dough Bars. Pull up a chair, grab a bite, and savor the simple joy of homemade goodness.