Irresistible Christmas Cherry Bars That Will Sweeten Your Holiday Season
Christmas Cherry Bars have a special place in my heart—and on my holiday dessert table every year. They’re the kind of treat that instantly brings back memories of standing on a stool in my grandmother’s kitchen, sneaking bites of cherry filling while she mixed the dough. These bars are more than just a sweet snack; they’re a festive hug wrapped in buttery, crumbly layers and bright, tangy cherries. Over the years, as our family grew busier and life got a little more hectic, I found that making these bars was my way of slowing down, connecting with my loved ones, and passing on a little slice of our story. If you’re looking for a dessert that’s both approachable and bursting with holiday cheer, these Christmas Cherry Bars might just become your new favorite tradition too.
Table of Contents
Why You’ll Love This Christmas Cherry Bars
There’s something magical about recipes that feel like home, and Christmas Cherry Bars fit that description perfectly. For me, food has always been the thread that ties my family together, and these bars are no exception. They’re simple enough to whip up on a busy weeknight but special enough to serve at holiday gatherings when you want to show a little extra love. The sweet yet tart cherry filling nestled between buttery layers of crumbly crust is a classic combination that never disappoints.
What I love most about this recipe is how it bridges generations. As a mom, I adore how my kids’ eyes light up when they see these bars come out of the oven, and as a wife, I appreciate the way sharing food helps us say “I love you” without words. These bars are proof that sometimes the simplest ingredients, combined with a little patience and care, can create something truly memorable.
“Cooking became my way to slow down, connect, and show love.”
Whether you’re new to baking or a seasoned pro, this recipe offers a beautiful balance of ease and elegance. It’s a recipe I return to year after year because it’s comforting, festive, and a little bit nostalgic—just like the holidays should be.
Ingredients You’ll Need for This Christmas Cherry Bars
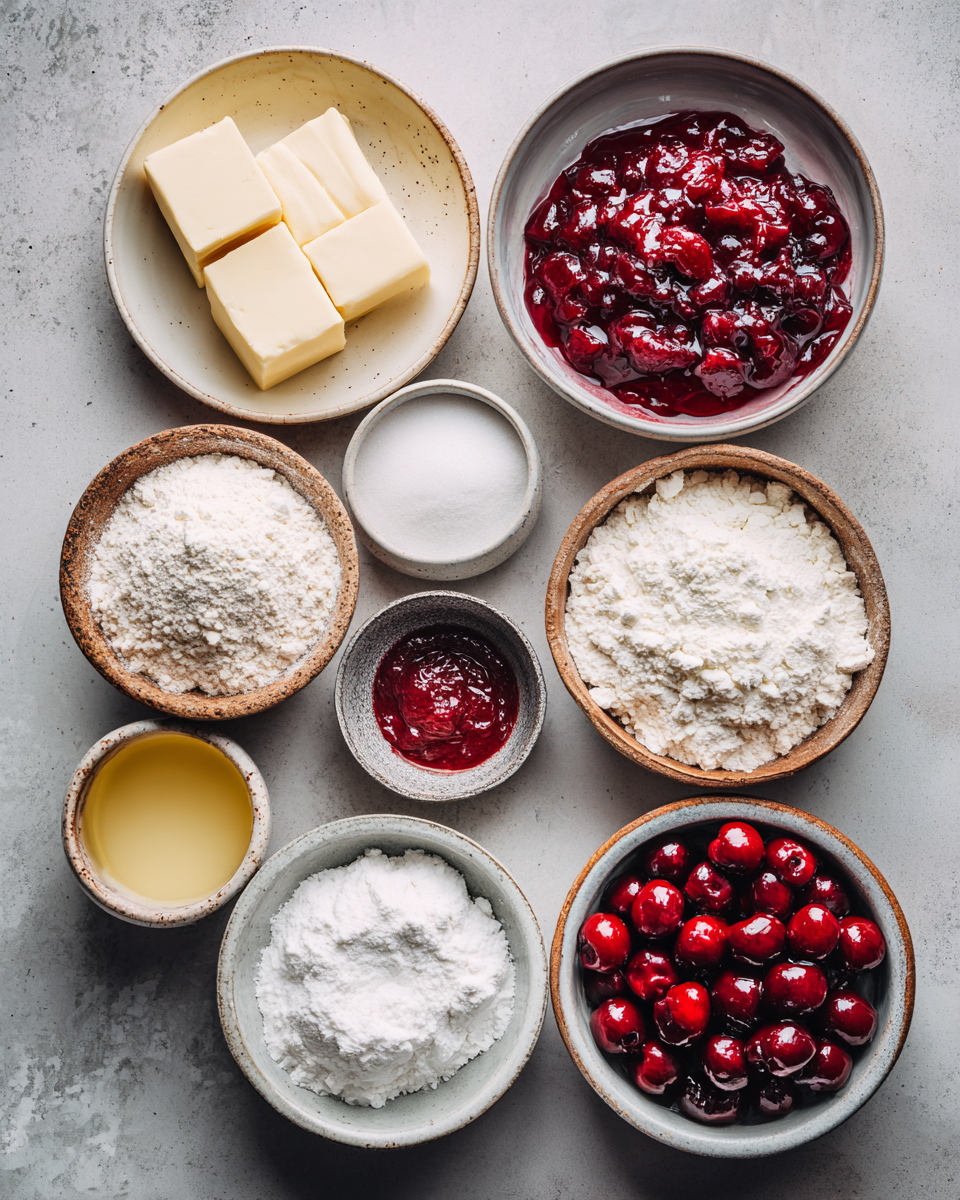
- 2 ¼ cups all-purpose flour (can substitute with gluten-free flour blend for gluten-free option)
- 1 cup unsalted butter, softened
- ¾ cup granulated sugar
- 1 teaspoon vanilla extract
- ½ teaspoon almond extract (optional, but adds a lovely depth)
- ½ teaspoon salt
- 1 (21-ounce) can cherry pie filling (or homemade cherry filling if you prefer)
- ¼ cup powdered sugar (for dusting on top)
When I first started baking with my kids, I loved how forgiving this recipe was. If you don’t have almond extract on hand, vanilla alone works beautifully. And if you want to get a little creative, swapping in fresh cherries during cherry season makes this an even more special treat. I’ve also found that using a high-quality canned cherry pie filling really saves time without sacrificing flavor—because let’s be honest, sometimes we all need a shortcut.
Nutrition Facts
- Calories: Approximately 280 per bar (based on 12 bars per batch)
- Protein: 3g
- Fat: 15g (mostly from butter)
- Carbohydrates: 32g
- Fiber: 1g
- Sugar: 18g
- Sodium: 120mg
Keep in mind, these bars are a delightful indulgence—perfect for special occasions or when you want to treat your family to something a little extra. The butter gives them that rich, satisfying flavor, while the cherries add a burst of fruity freshness. If you want to lighten things up, you can always cut the bars into smaller squares or pair them with fresh fruit for a balanced dessert.
Print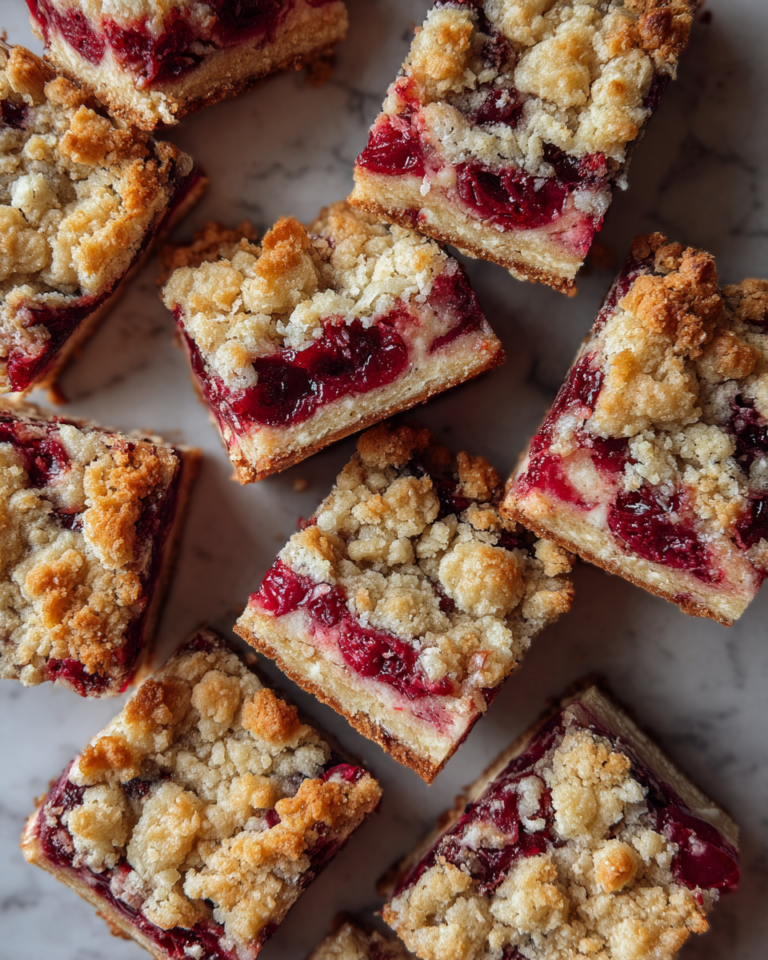
Irresistible Christmas Cherry Bars That Will Sweeten Your Holiday Season
Learn how to make delicious Christmas Cherry Bars. Easy recipe with step-by-step instructions.
- Total Time: 45 minutes
- Yield: 4 servings 1x
Ingredients
- 2 ¼ cups all-purpose flour (can substitute with gluten-free flour blend for gluten-free option)
- 1 cup unsalted butter, softened
- ¾ cup granulated sugar
- 1 teaspoon vanilla extract
- ½ teaspoon almond extract (optional, but adds a lovely depth)
- ½ teaspoon salt
- 1 (21-ounce) can cherry pie filling (or homemade cherry filling if you prefer)
- ¼ cup powdered sugar (for dusting on top)
When I first started baking with my kids, I loved how forgiving this recipe was. If you don’t have almond extract on hand, vanilla alone works beautifully. And if you want to get a little creative, swapping in fresh cherries during cherry season makes this an even more special treat. I’ve also found that using a high-quality canned cherry pie filling really saves time without sacrificing flavor—because let’s be honest, sometimes we all need a shortcut.
Instructions
- Preheat your oven to 350°F (175°C) and line a 9×13-inch baking pan with parchment paper, leaving some overhang to lift the bars out easily once baked.
- In a large bowl, combine the softened butter and granulated sugar. Using a hand mixer or stand mixer, beat until the mixture is light and fluffy—this usually takes about 3-4 minutes. This step is key to getting that tender crumb, so don’t rush it.
- Add the vanilla extract, almond extract (if using), and salt. Mix until combined.
- Gradually add the flour, mixing on low speed just until the dough starts to come together. It will be crumbly but should hold when pressed.
- Press about two-thirds of the dough evenly into the bottom of your prepared pan. I like to use my hands here—there’s something so comforting about the tactile part of baking, isn’t there? Plus, it helps create an even layer.
- Spread the cherry pie filling evenly over the dough base. Try not to disturb the crust too much to keep that lovely layer intact.
- Crumble the remaining dough over the cherries, covering as much as you can. The bars will have a rustic, homemade look, which is part of their charm.
- Bake for 40-45 minutes, or until the top is golden and the filling is bubbly around the edges. Your kitchen will start to smell like Christmas magic in no time!
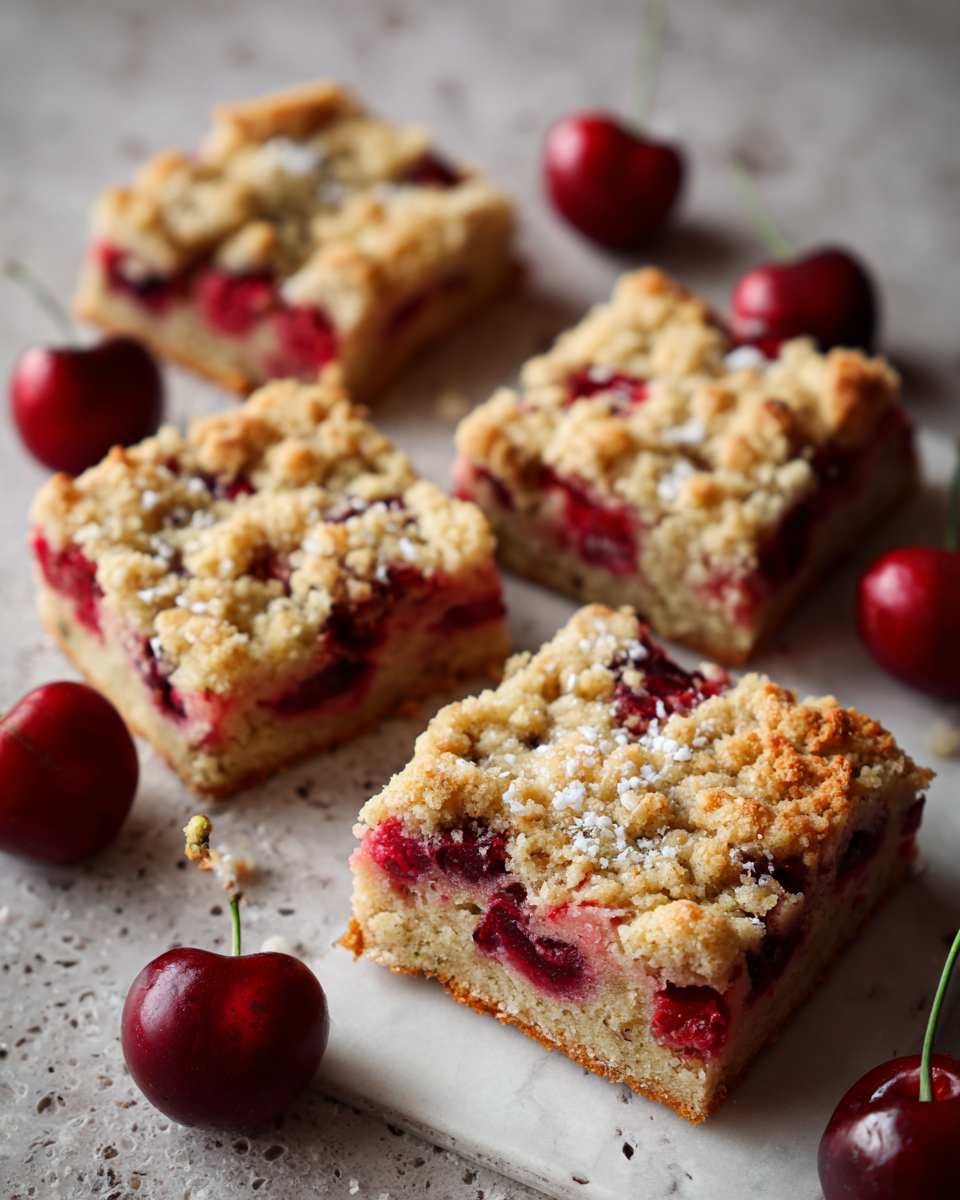
- Allow the bars to cool completely in the pan on a wire rack. Once cooled, use the parchment paper to lift the bars out, then cut into 12 squares.
- Dust the tops with powdered sugar just before serving for that festive extra touch.
I remember the first time I made these bars for a holiday party. I was balancing a toddler on one hip and stirring dough with the other hand, but the end result was worth every chaotic moment. These bars have a way of bringing people together, and that’s the real magic of baking in my book.
- Prep Time: 15 minutes
- Cook Time: 30 minutes
- Category: Main Dish
- Method: Cooking
- Cuisine: International
Steps to Create Your Christmas Cherry Bars
- Preheat your oven to 350°F (175°C) and line a 9×13-inch baking pan with parchment paper, leaving some overhang to lift the bars out easily once baked.
- In a large bowl, combine the softened butter and granulated sugar. Using a hand mixer or stand mixer, beat until the mixture is light and fluffy—this usually takes about 3-4 minutes. This step is key to getting that tender crumb, so don’t rush it.
- Add the vanilla extract, almond extract (if using), and salt. Mix until combined.
- Gradually add the flour, mixing on low speed just until the dough starts to come together. It will be crumbly but should hold when pressed.
- Press about two-thirds of the dough evenly into the bottom of your prepared pan. I like to use my hands here—there’s something so comforting about the tactile part of baking, isn’t there? Plus, it helps create an even layer.
- Spread the cherry pie filling evenly over the dough base. Try not to disturb the crust too much to keep that lovely layer intact.
- Crumble the remaining dough over the cherries, covering as much as you can. The bars will have a rustic, homemade look, which is part of their charm.
- Bake for 40-45 minutes, or until the top is golden and the filling is bubbly around the edges. Your kitchen will start to smell like Christmas magic in no time!
- Allow the bars to cool completely in the pan on a wire rack. Once cooled, use the parchment paper to lift the bars out, then cut into 12 squares.
- Dust the tops with powdered sugar just before serving for that festive extra touch.
I remember the first time I made these bars for a holiday party. I was balancing a toddler on one hip and stirring dough with the other hand, but the end result was worth every chaotic moment. These bars have a way of bringing people together, and that’s the real magic of baking in my book. Learn more: Irresistible Brown Butter Toffee Blondies That Will Sweeten Your Day
Tips for Making the Best Christmas Cherry Bars
- Don’t skip the chilling step: If your dough feels too soft or sticky, refrigerate it for 15-20 minutes before pressing it into the pan. This helps prevent spreading and keeps the layers distinct.
- Use room temperature butter: Softened butter creams better with sugar, giving you that light, tender crust.
- Be gentle when layering: Press the bottom crust firmly, but crumble the top dough loosely to create a lovely texture contrast.
- Watch your baking time: Every oven is a little different, so start checking around 40 minutes. The bars are ready when the top is golden and you see some bubbling filling.
- Let them cool completely: This step is crucial for clean slices and the best texture.
- Customize your cherries: For a twist, try mixing in a splash of orange zest or a pinch of cinnamon into the cherry filling for extra warmth and holiday flavor.
Over the years, I’ve learned that the little details make a big difference. My grandmother always said, “Cook with love, and the food will taste better.” I couldn’t agree more. These tips come straight from those kitchen moments with her, and I hope they help you create your own holiday memories.
Serving Suggestions and Pairings
When it comes to serving Christmas Cherry Bars, simplicity is key. They’re sweet and satisfying on their own, but a few thoughtful pairings can elevate them even more.
- Serve warm with a scoop of vanilla ice cream or a dollop of freshly whipped cream for a classic dessert experience.
- Pair with a hot cup of spiced tea or mulled cider to complement the cherry’s tartness.
- For a brunch twist, offer alongside creamy yogurt and fresh fruit—these bars add a festive touch without overwhelming the palate.
- Wrap a few bars in wax paper and tie with a ribbon for a charming edible gift that friends and neighbors will adore.
I love how these bars bring people around the table, whether it’s a cozy family night or a bustling holiday gathering. One Christmas, we even packed them up for a picnic in the snow—talk about sweet, wintry memories!
Storage and Reheating Tips
Life is busy, and sometimes we need to make treats ahead of time or save leftovers for later. Here’s how to keep your Christmas Cherry Bars fresh and delicious:
- Store in an airtight container at room temperature for up to 3 days.
- For longer storage, refrigerate for up to one week. Bring to room temperature before serving for the best texture.
- Freeze individual bars wrapped tightly in plastic wrap and stored in a freezer-safe bag for up to 3 months.
- To reheat, warm bars in a 325°F oven for 10-15 minutes or microwave for 20-30 seconds until just warm.
When I’m juggling work, family, and dinner prep, having a stash of these bars in the freezer has been a lifesaver. They thaw quickly and taste just as good as the day I baked them—perfect for unexpected guests or a last-minute holiday dessert.
Frequently Asked Questions
What are the main ingredients for Christmas Cherry Bars?
The main ingredients for Christmas Cherry Bars include the items listed in our ingredients section above. Each ingredient plays a crucial role in achieving the perfect flavor and texture.
How long does it take to make Christmas Cherry Bars?
The total time to make Christmas Cherry Bars includes both preparation and cooking time. Check the recipe card above for exact timing details.
Can I make Christmas Cherry Bars ahead of time?
Yes, Christmas Cherry Bars can often be prepared in advance. Store it properly in an airtight container in the refrigerator and consume within the recommended timeframe.
What can I serve with Christmas Cherry Bars?
Christmas Cherry Bars pairs well with various sides and accompaniments. Consider the serving suggestions mentioned in the recipe for the best dining experience.
Is Christmas Cherry Bars suitable for special diets?
Depending on the ingredients used, Christmas Cherry Bars may be adapted for various dietary needs. Check the ingredients list and consider substitutions as needed for your dietary requirements.
Final Thoughts
Christmas Cherry Bars are more than just a dessert in my kitchen—they’re a tradition, a memory, and a way to slow down and savor the moments that matter most. From my grandmother’s kitchen to my own bustling home, this recipe has been a delicious constant, reminding me that food is about living, loving, and sharing stories through every bite.
If you’re looking for a holiday treat that’s approachable, festive, and full of heart, I hope you’ll give these bars a try. Whether you’re baking with little helpers, preparing for a big family gathering, or sneaking a quiet moment with a cup of tea, these bars are here to make your season a little sweeter.
So, grab your mixing bowl and your favorite holiday playlist, and let’s make some memories—one Christmas Cherry Bar at a time.